1. Don't use Internet Explorer 6 to view this DVD! Microsoft has dropped Explorer and is no longer updating it and it will mess up some pages. Use FireFox (my browser of choice),Chrome, or Opera. Microsoft has dropped support for and will never update Internet Explorer or any of their myriad other browsers.
2. View the DVD in Fullscreen mode (F11 key in Firefox). You will save a lot of time & trouble moving slider bars or mouse wheeling around the pages. The images are large because they have to be in order to be readable, not because I like producing 3,000 x 4,000 pixel maps! When you view the DVD in Fullscreen mode, the forward and back buttons disappear. In Firefox you press the little square in the top right corner, back key or Alt-left arrow to go back to the last page and Alt-right arrow to go forward again. The Alt-arrow keys are fast! Press F11 again, or move the cursor to the upper right corner to exit Fullscreen mode. Alt+ and Alt - make the screen larger or smaller so you can zoom in and out of all the maps. I'm sure the shortcuts are similar for other browsers (don't quote me on that). Learn these anyway and you'll love yourself for it. Or do what I do, use the forward and back buttons on your tricked out mouse :)
4. Just point the mouse to the top of the screen and the forward, back, and reload buttons appear at the left. You can view any number of pages simultaneously by right clicking on the tab you're viewing and "Duplicate Tab".
5. Clicking on all maps and many photos
on the DVD results in a larger version of the map/photo, so feel free to click on anything that is
clickable!
6. It's very useful to make the text larger if you're nearly blind like me. Use the Ctrl - "+" (hold down the Ctrl key and press the +/= or the + key) and Ctrl - "-" key combinations to increase and decrease the font size. This also increases or decreases the size of the maps, which is incredibly useful for navigating around in them. You can zoom WAY IN to the maps, they are very large images.
7. Many bold text items are links, if you hover over them with your mouse they will be highlighted and underlined. Links are the only way to access almost all of the content of the DVD (especially the maps)!
8. GPS Waypoints
The DVD contains files in several formats to print and upload to your GPS unit. These include a waypoint list of the coordinates of each dig location in ASCII text format. You can print individual waypoints or groups of waypoints from this. Some GPS units may be able to directly import this file; it's the most simple way to describe a list of waypoints that there is. It has an export file in WGS84 Waypoint+ text file format; please refer to the documentation for your GPS unit to see if you can upload it. See below about how you can edit it. This file can be uploaded to a GPS unit with the proper hardware and software. It may have to be reformatted for your particular software and GPS unit. I have instructions for a few makes of GPS; Email me if you are having trouble. The file contains almost 3,000 waypoints and since GPS units can store between 500 and 5,000 waypoints you may have to edit the file to delete waypoints! If you want the waypoints already on your GPS to stay there I suggest using the utility below to add new waypoints without overwriting your own!
The program GPS Utility works with just about any GPS and is free for files containing 100 or fewer waypoints. If you register the program for $40 it will import an unlimited number of waypoints (note that most GPS units can only store 500 waypoints!). It has a waypoint file saved in GPS Utility's format. Since the unregistered version can only import 100 waypoints at a time, you need to edit the file "Waypoints for GPS.wpt" with a text editor such as notepad or wordpad. Right-click on the file in Windows Explorer or My Computer and select open with...and select notepad or wordpad.
The file will look something like this:
Datum,WGS 84,xxxx,0,0,0,0,0
WP,DM,10MICR  , NXX.XXXX, -WXX.XXXX,12/30/1899,00:00:00,Tenmile Creek agate in gravels
WP,DM,15MILE  , NXX.XXXX, -WXX.XXXX,12/30/1899,00:00:00,Fifteenmile Canyon Amber 2 miles up cr. from bridge Approx loc!
WP,DM,25MICR  , NXX.XXXX, -WXX.XXXX,12/30/1899,00:00:00,Twentyfive Mile Creek Kyanite crystals loc approx.! See WSMC maps
etc...
All you need to do delete all but 100 waypoints, save the file as something else, open it again, and repeat until you have the waypoints you want to upload to your GPS. Don't forget to leave the first line in each file or it won't work. Then open the files in GPS Utility and follow the help to upload them to your GPS unit. Don't mess with the datum; leave it at WGS84 or your waypoints will be off!
For Mozilla Firefox (procedures for Netscape are identical): If you just want the whole map on one sheet of paper, right click on the map image, select view image, and choose File...Print Preview from the menus. Then click Page Setup, and set the orientation to landscape if the image is wider than it is tall. Click the Margins & Header/Footer tab and set headers and footers to all --blank--. The scale will say 100% but it isn't; Netscape will shrink the image to fit on the page regardless of what you tell it to do. You can shrink the margins but at some point your printer will complain about the margins being smaller than the printable area. 1/4" margins are generally safe to use. The text will likely be unreadable and I don't know about you but I can't deal with maps printed at the wrong scale! If you zoom in by clicking on the image, the map will be at full scale. Then you will be printing only the portion of the map that displays in the window. Now you can't print anything other than what shows in the window. Netscape and old versions of IE used to allow you to scroll around the image and print only what shows on the screen. This must have been too functional so the newer versions of all Internet browsers left it out. Typical!
For Internet Explorer 11: I don't have a procedure for previous versions of IE here becasue they all stink even worse at printing anything so upgrade! Critical: Click anywhere on the map and use the scroll bars to view the upper-left corner. Click the arrow next to the printer icon on the toolbar and select Print...preview. Click the arrow next to the box that has "As laid out on screen" and select "only the selected frame". If you didn't click on the map you'll find out now - only the top or left menus will show up. First turn headers and footers off in the top menu bar. The preview window will show the upper-left corner of the map as it appears on your screen. The box on the right will have "Shrink to fit". Leave it be for the time being. At the bottom of the window will be a Page 1 of X (1, 2, or more depending on the size of the map). Click the right arrow to see the next page. The pages are always arranged top-to-bottom, so will scroll down the map from the upper left. So for example if the map is 2 screens tall in your browser, page 2 will be the bottom-left corner. Click the gear icon to set margins to 0; they will change to the smallest margins your printer can handle.
Only the portion of the map that shows on the screen will be printed, and fit to the page. You can scroll around the map and print different views then piece them together to make a big map just like you did in kindergarten :) HOWEVER you can play with scale box to see more of the map on the screen; unfortunately the smallest it lets you view is 30% which is still too big for most maps on the DVD. If you are nuts like me select 100% and it will print pretty close to the exact size of the USGS topo maps I used to produce the images. You can make maps the size of your kitchen table if you like :)
Anyway now you can print the left part of the map, and scroll right to the edge of what you see on the paper and repeat until you run out of ink :(
The Second Easiest Way That Looks Pretty Decent: It took a while (too long!), but I finally found an fairly straightforward solution to printing the maps on Windows PCa at a reasonable size so they can easily be read. This method is much easier than the following methods (although not as accurate).
Find the map on the DVD as in the instructions - browse the DVD and select the file name of the map ending with .jpg, for example if you are looking at the topo map for Wynoochee WA, click on Maps then Wynoochee.jpg (click on the 100k Maps folder for the overview maps). Right-click the file and select open with… The window that opens should have “Paint” as an option, select it and the image will open in MS Paint. Choose print then page setup from the left menu button (Windows 7) or choose Print from the top menu bar (earlier Windows versions).
In the box that opens is a Fit to button, select it. Then type in the number of pages with the horizontal pages first and the vertical second. For example the Wynoochee map prints best at 2 by 2 pages in Landscape orientation. You’ll have to play with the maps to get the best resolution; for square-ish maps use the same horizontal and vertical pages, for tall maps try Portrait orientation with one more vertical page, for wide maps try Landscape orientation with one more horizontal page.
Then print and adjust accordingly. Unfortunately Paint does’t have a preview window that makes any sense, so I suggest setting your printer to fast and grayscale printing in Print Setup when the print box shows up, then standard and color when you are satisfied with the print. These menu options are probably different with every brand of printer but there will be similar choices for all of them (my printer is a Canon and this is how they show up). Then trim up and tape the pages together as in the instructions.
The one drawback to this method is that unless you’re very lucky, you won’t get the print scale exactly right, so prints of different maps will probably be at different scales and you'll have to get used to comparing maps at different scales, especially when you’re crossing over to an adjacent map.
The Best Way That Looks Perfect: I suggest that you use image editing or viewing software that supports Image Tiling. Corel Paint Shop Pro is one such program that can print JPG images on multiple sheets at the native resolution. It ain't cheap but sometimes it goes on sale. If you routinely edit and print photos, it offers a bazillion ways to customize them that the free or cheap-o "crippleware" that comes with most new PCs could never do. I use it almost every day! A free program I have been told that works is PagePlus SE. I am quite sure that Adobe Photoshop does this as well, but I've never had a copy to play with. To print the images in landscape format on 8.5 x 11 paper with registration marks in Paint Shop Pro (at least the last 4 or 5 versions through X4), follow these steps:
1. Open the image that you want to print. If it is wider than it is
tall, follow the instructions below. If it is taller than it is wide,
simply switch the settings in step 6.
2. Choose View > Grid.
3. Choose View > Snap To Grid.
4. Choose View > Change Grid and Guide and Snap Properties.
5. From the Units drop down box in Default Settings choose Inches.
Choose a Horizontal grids position of 10.5 and a Vertical grids
position of 8 and click OK. There should be grid lines in roughly the
form of an 8.5 x 11 landscape page on the image. If the format needs to
be portrait, switch the horizontal and vertical settings.
6. In the Current image settings area, set the units and grid settings to the same values as in step 5.
7. Click Okay to close the box, Now click the Selection Tool (it looks like a dotted outline of a square).
8. In the Tool Options palette (press F4 on the keyboard if you don't
see it) and make sure Antialias is unmarked and Feather is set to 0.
(Note: I cannot uncheck anti-alias in my version of the software.) This applies to older versions; in my version (Paint Shop Photo X4) these defaults are already set.
9. Select along the grid lines (start in the upper left corner of the
Grid by clicking then move to the lower right corner of the grid
rectangle and let go of the mouse button).
10. Choose Edit > Copy.
11. Choose Edit > Paste > As New Image.
12. Choose File...Print and check to make sure the scale is set to 100%
and the layout is set the same way as the grid (i.e. portrait or
landscape). In my version it will nag at you to scale the image to fit the page; don't do it.
13. Click the Options tab and check
Registration marks. Click the Print button to print the image. I set my
printer to the maximum possible resolution by selecting
Printer...Properties and setting it to the highest quality.
14. Close the new image.
15. Go back and do steps 9-14 until each grid has been printed.
The next time you have to do this, you only have to choose the
Selection tool and follow steps 9-14 because the program remembers what
the last gridline spacing was.
I have found exactly one software program that will print oversized images on multiple pages. It works on Windows XP, Vista and 7, but according to the program authors it might not work on all versions of Windows (or at all on a MAC). The solution involves a few steps that aren't at all obvious from the program:
1. Download and install PosterPrint from here: PosterPrint You must register the program or the printout will have a "DEMO" watermark. If you don't mind the watermark, then feel free to use the program anyway :)
I have worked out a discount for users of the DVD with the author of PosterPrint. The cost to you is $13, 50% off the regular price of $25. Please let the authors at GrandUtils know that you found the program through OreRockOn so that they know how many people take advantage of this special offer. Thanks to GrandUtils for offering this deal to us; I highly recommend the program for printing the maps on the DVD and if you ever want to print large images such as banners or posters this program is far and away the best option to do so in Windows.
2. Depending on your version of Windows, you now need to set up a custom layout that will accommodate multiple sheet printing. In Windows XP, click the Start menu, and select Printers and Faxes (note: if you don't see the Printers and Faxes option, it's in the Control Panel). Under File in the top menu bar, select Server Properties. Check the box next to Create a New Form, give it a name so you can remember it (I used _GIANT so it shows as the first entry). Make the size huge; I used 96 x 96 inches. Click on OK.
In Windows Vista, Click on the Start button in the lower left corner of the toolbar, Control Panel, Printers. Right click anywhere in the list of printers on the right side of the window that opens and select Server Properties... Under the first tab Forms check Create a new form. Change the form name and under Paper size change the width and height as above. Click on Save Form, then Close.3.These directions apply to Windows XP. I know that the same or very similar steps get you the same end result in other versions of Windows.
In Windows Explorer find the map you want to print, either in the Maps or the 100k Maps directory on the DVD. Right click on the file name and select Print. The "Photo Printing Wizard" will open that gives you silly choices to print the image (yeah I know it works for most people but JEEZ I hate not having real options to print my pics!). It will take a LONG time to start up since it has to generate thumbnails of all the maps in the directory (yeah I know, stupid, but go figure). Click Next then Next again on the following screen. In the first dropdown box under "What printer do you want to use?" select PosterPrint as the printer, click Next, then Next again on the following screen, then Finish. The map image will open up in PosterPrint.
--OR--
Open the map file you want to print in your favorite image editing program (note: this may or may not work in all image editing programs! It works for sure in Paint Shop Pro). Most new PCs and even digital cameras these days come bundled with some sort of image editing program (if not all LOL). Select the print option that allows you to change the printing setup (i.e., not the "instant print" button, if it exists). In Paint Shop Pro, I click Printer... and select PosterPrint from the dropdown menu. Click on OK, the click on Print. The PosterPrint program will open in a new window and your map will be displayed. I am sure there are very similar options in other graphics software.
In Windows Vista, follow the same steps above, the Print Pictures wizard is a little different but the steps are the same. One nice thing about Vista is that the pixel size of the image is shown at the bottom of the explorer window as Dimensions: when you select the map image and right-click on Properties. . Be sure to change the layout to reflect the aspect ratio of the image, in other words if it is wider than it is tall select landscape, or if it is taller than it is wide, portrait. Vista think it knows the aspect ratio of the image but it is often wrong (thanks again Bill Gates).
4. Now you need to know the "print size" of the image. In my program (Paint Shop Pro X), when I click on Print..., the print size is displayed in inches; for example the the size of the "Pahsimeroi 100k" map on the DVD is 19.025" wide by 17.04" high. I can also get all the values when I select Image...Image Information. If you only have Windows, you are not SOL. You can use this calculator to get the image print size. I hope this web page stays up forever, but it probably won't. If I find out that it is no longer active I will post an alternative method here. The dimensions of the image in pixels are found in Windows Explorer, when you hover your mouse over the file name it is displayed under "Dimensions" as width x height. When you right click on the file and select properties, then summary, the pixel dimensions are shown along with the print resolution ("DPI"). Almost all of the maps print at 300 DPI. A few of the maps print at 124 DPI (no I don't know why this is, it just is LOL). Enter the width and height and DPI values into the calculator above to get the dimensions in inches. These will be slightly different than your graphics program reports, but don't sweat it, there is no noticeable difference in the printed maps.
5. Now, you can print the map (whew!). in the units area of PosterPrint, select Inch in the dropdown box, then select the Units button, and enter the width. The Keep Aspect Ratio box should be checked; if not then check it. The height is now set automatically. Under Printout, select Smooth Resize (yeah I know the image isn't being resized. Oh well). Now click on the printer icon or select File...Print, and it should print at the native scale (4 pages for the Pahsimeroi map). It prints margins so you can tape the pages together ("glue margins", not really, they are just guides that say "Put some glue here". DOH!). You will have to trim off the tiny margins on the sheets that are on top when you tape it together since I can't figure out how to turn these off (none of the options in PosterPrint seem to do this).
In Windows Vista, follow the same steps above, the Print Pictures wizard is a little different but the steps are the same. One nice thing about Vista is that the pixel size of the image is shown at the bottom of the explorer window as Dimensions: when you select the map image.
Yeah I know it's a royal pain in the arse but once you have it set up all you have to do is get the print size of the image, print it to PosterPrint and BAM!™ it's printed!
The Site Map on the DVD Version 5.0 doesn't work properly (it does work properly when the DVD contents are copied to a hard drive, however). Using it will result in the loss of the navigation bar at the top of each page and some strange effects will occur when using the navigation buttons at the bottom of each page.
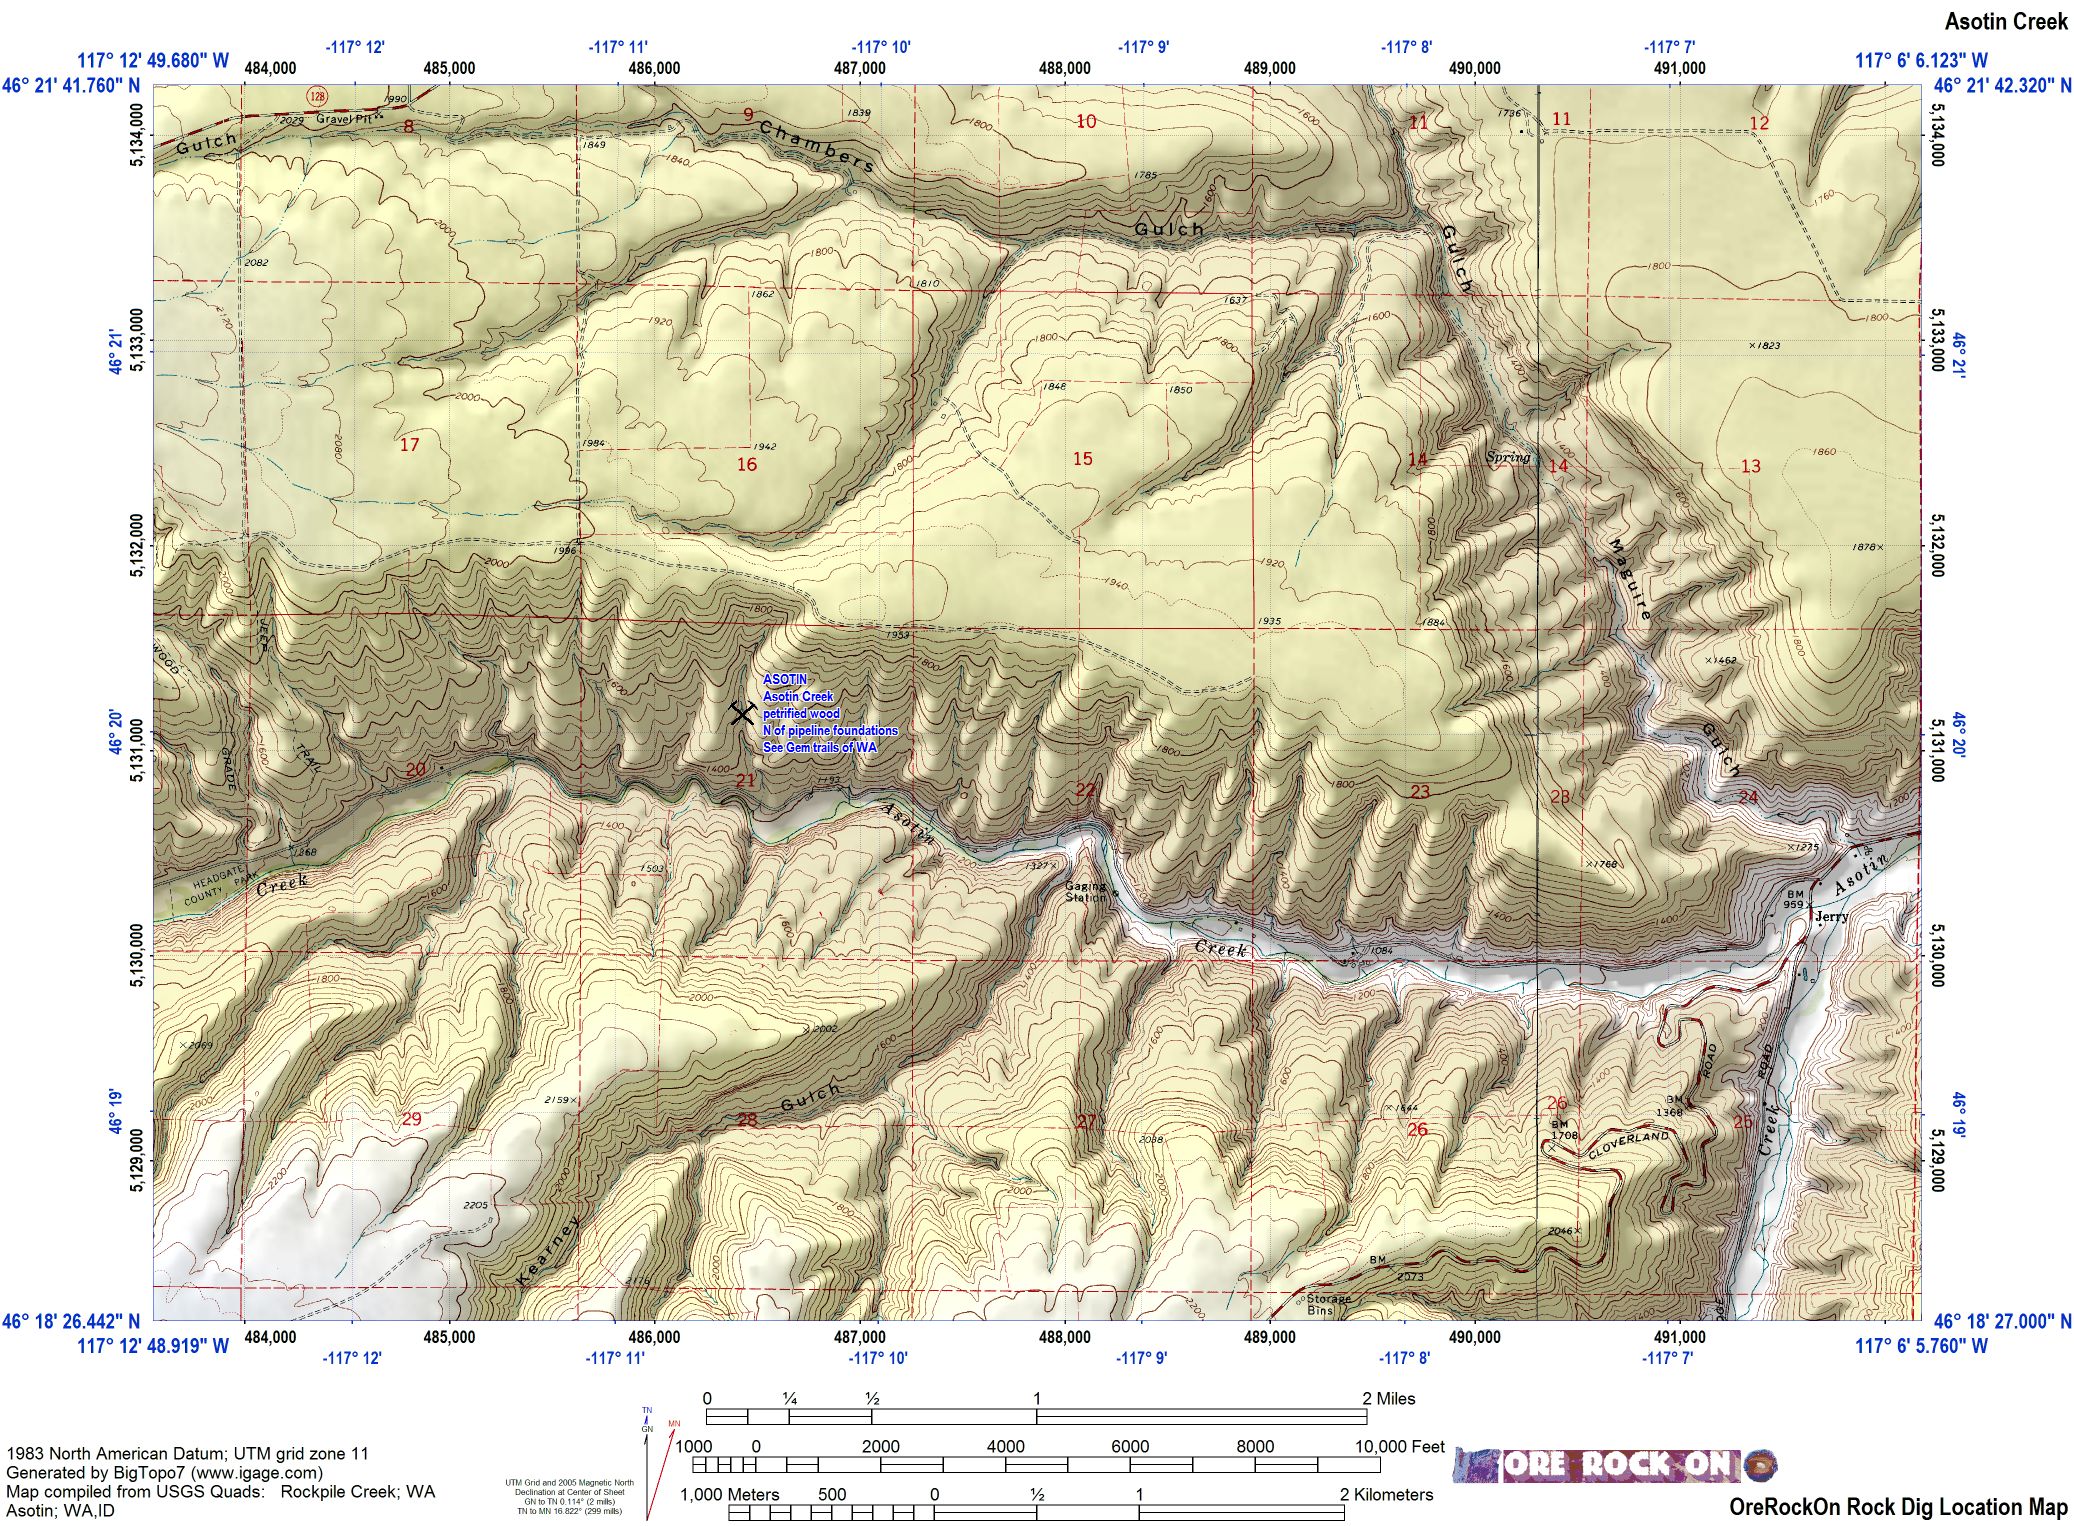
The Asotin Creek map on the Southeast Washington: Asotin overview map is incorrectly linked to another image. Download the correct map here.
This list contains all of the the internet (external) links on the DVD Version 5.3 (which worked on 5.2) that I found are broken. If any of the links on your DVD do not work, check here for the most current links. Note that websites come and go and frequently change the location of their pages, so even this list is bound to go out of date. If you can't find something, you can always Google it (hint: Google anything before asking a question of anyone online, 90% of the time you will find the answer through Google if you persist!).
and more...if something doesn't work please email me!
 Back to the DVD Page!
 Copyright © 1997 - 2026
Tim Fisher
Users may view and print this information for personal use only. Unauthorized copying or distribution of this page or any of its contents without the express permission of the author is expressly forbidden.